
John’s Quest for Easy HDRi
So for those of you unfamiliar with the term HDR, or HDRi . . . it stands for High Dynamic Range Imaging. The basic premise is this, cameras cannot capture all the detail of a picture in one shot. The camera compensates for the amount of light in the shot, but photos are not really true reflections of what our eyes may see. Our eyes adjust as we look around the room to let in more light as we move through the shadows and less light as we move in through the bright spots. A camera has to compose the whole image as it sees it and make a best guess. The way that you can override a camera is by adjusting the EV, or Exposure Value. Bringing the EV up a step or two reveals the bright spots in an image and bringing it down reveals the shadows. (I’m not a real technical whiz, so I may be getting some of this wrong, but this is how I understand it so far). What HDR does is allow you to take 3 (or more) shots of the same scene, ideally on a tripod with a remote shutter release and combine them into one final image that reveals highlights and shadows and brings out all the details of a scene.
The basic process is this, Take one photo at 0.0 EV, At least one photo at -1.0 or -2.0 EV and at least one photo at +1.0 or +2.0 EV. If you have the time and patience, taking more shots will give you a better image (so I’m told) and you can adjust your EV in smaller increments. 0.5 EV, 1.0 EV, 1.5 EV, etc. Some cameras even have an auto-bracketing feature that will allow you to fire the shutter off, hold down the release and get three shots in succession one at 0.0 EV and the others at either +/- 1.0 or +/- 2.0 EV. My camera (Nikon D80) happens to have this function. So today, I went to a home I’m listing next week and played around with shooting photos. As I’ve had time, I’ve been playing with Photoshop CS3 (Can’t wait for CS4) and another program specifically designed for HDR processing, Photomatix Pro. Below is my first attempt at an HDR image, using three images. One at 0.0 EV, one at -2.0 EV and the final one at +2.0 EV. Had I been thinking, I would have composed the same shot with 0.0, +1.0 and -1.0 just to compare.
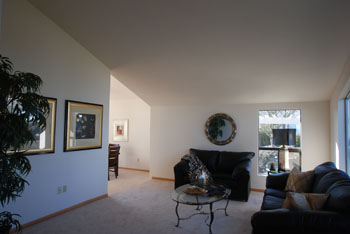
Here is the original photo at 0.0 EV. Notice how the photo just looks “flat”? Nothing really grabs you?:
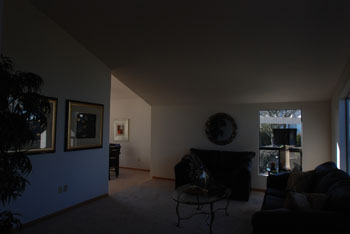
Here is the photo at -2.0 EV. Everything is way too dark:
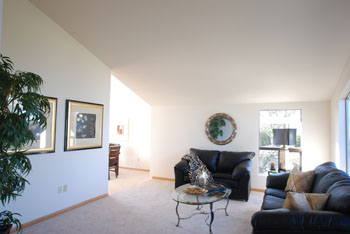
Here is the photo at +2.0 EV. Notice how the bright spots are overly bright? Like the light on the dining room wall? And the highlight behind the sofa next to the window?:
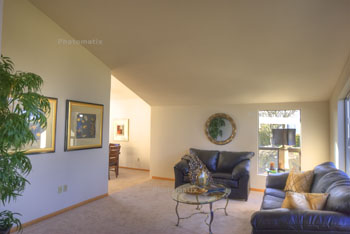
And finally after processing through PhotoMatix and using their Tone Mapping function, here is the final combined HDR image. Nothing too overblown, nothing understated. The details in the sofa and chairs pop out. The light looks natural on the walls. And overall much brighter and clearer than the original 0.0 EV image:
Pretty amazing stuff. This will eventually make me a better photographer and allow me to do a much better job for my clients as I learn how to tweak these images to get the most amount of detail from them. I want my images to just SHINE on the MLS to hopefully attract more and more buyers to the home. The research continues . . .
Annette | Mar 6, 2009 at 7:56 pm
I really appreciate how you put so much effort into delivering the best of who you are to your clients. I know that all your "playing around" with your camera will pay off in huge dividends for you as you continue on in your profession. Photography makes you stop and really look at the world around you. That is reward enough I think for doing it.
Mike M. | Mar 9, 2009 at 10:21 am
What a great result. I never knew that this wae possible. Thanks for sharing such a great technique and posibility for improving photos to my attention.